|
9.7 Welding Procedures
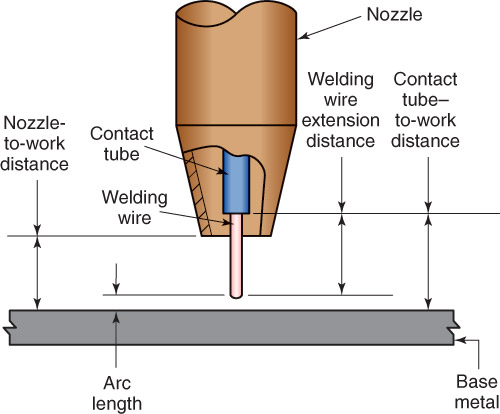
Before beginning to weld, the welding station should be checked for safety. All electrical, gas, and water connections must be checked for tightness. Weldments should be tack welded or secured in fixtures prior to welding. Backing may be needed when complete joint penetration is required. Backing refers to a plate, ring, strip, or other device placed on the root side of the joint to control penetration of the weld. Most arc welding processes require the welder to control the arc length, welding speed, and torch or gun angle to obtain a good weld. In GMAW and FCAW, the arc length remains constant and is determined by the arc voltage set on the welding machine. While gas metal or flux core arc welding, the welder must watch and control the distance from the nozzle or contact tube to the work. See Figure 9-42. By controlling the nozzle-to-work distance, the welder controls the electrode extension distance. |

Figure 9-43. Effects of the welding gun angle on the bead. A—Backhand. B—Perpendicular. C—Forehand. Notice that the backhand angle gives the deepest penetration.
|
The welding speed affects the bead width and penetration. A slower weld speed produces a wider bead and deeper penetration. Torch angle also affects the bead width and penetration. The terms forehand, backhand, and perpendicular are used to describe the angles at which the gun may be held in relation to the weld bead.
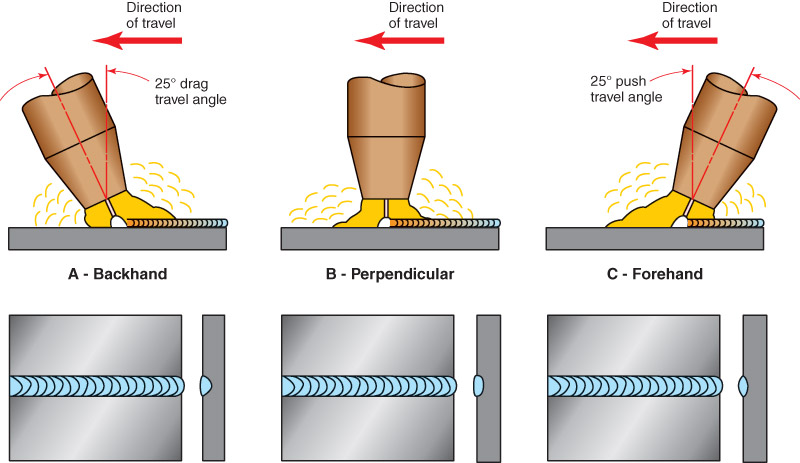
In forehand welding, the tip of the electrode points in the direction of travel. This is often referred to as a push angle or push travel angle. In backhand welding, the electrode tip points away from the direction of travel. This is often called a drag travel angle. Perpendicular welding is done with the electrode at a 90° angle to the base metal. This is a travel angle of zero. Figure 9-43 shows the effects of these various angles.
The backhand method gives the best penetration. A 25° travel angle forward of perpendicular gives the best penetration in the flat welding position, as shown in Figure 9-43. For the best control of the weld pool, a travel angle of 5°–15° forward of perpendicular is preferred for all positions.
To start welding, tip the top of the gun 5°–15° in the direction of travel. Use an auto darkening helmet or flip the non-auto-darkening helmet down over your eyes. To start the arc, the wire feeder, and the gas, squeeze the trigger on the gun. The wire arcs as soon as it feeds out far enough to touch the metal. No striking or up-and-down motion is required to start the arc, as is required with SMAW.
When the weld pool reaches the proper width, move the welding gun forward. Continue to move the gun along the weld, watching the width of the weld pool to maintain a uniform size. Continue at a steady forward speed until the end of the weld is reached. A run-off tab may be used to ensure a full-width bead to the end of the weld. Without a run-off tab, the end of the weld may have a crater (depression). This depression can be reduced by moving the electrode to the end of the weld and then back over the completed bead about 1/2″ (13mm). At the end of this reverse travel, the trigger switch is released. To shield the end of the weld, hold the gun in position to allow the gas postflow to protect the weld until it cools.
More than one pass may be required to fill a weld groove. Each pass should be cleaned before the next pass is laid. This is generally done with a wire brush or wheel. The glass-like coating on some gas metal arc welds is easily removed. The slag layer on a flux cored arc weld is heavier and requires more effort to remove.
Out-of-position welds require that leathers be worn. Molten base metal, filler metal, and spatter may fall on the welder. Therefore, a cap, coat, cape, and chaps should be worn to protect against burns.
9.8 Shutting Down the Station
When welding is stopped for an extended period, the station should be properly shut down.
Procedure for Shutting Down a GMAW/FCAW StationTo shut down the station, proceed as follows:
- Close the valve on the shielding gas cylinder or close the valve on the manifold.
- Press the purge switch to bleed or drain the shielding gas from the system.
- Turn the wire feeder off.
- Turn the welding machine off.
- Neatly coil the cable and hang up the gun.
- Neatly coil the ground cable and hang up the coil.
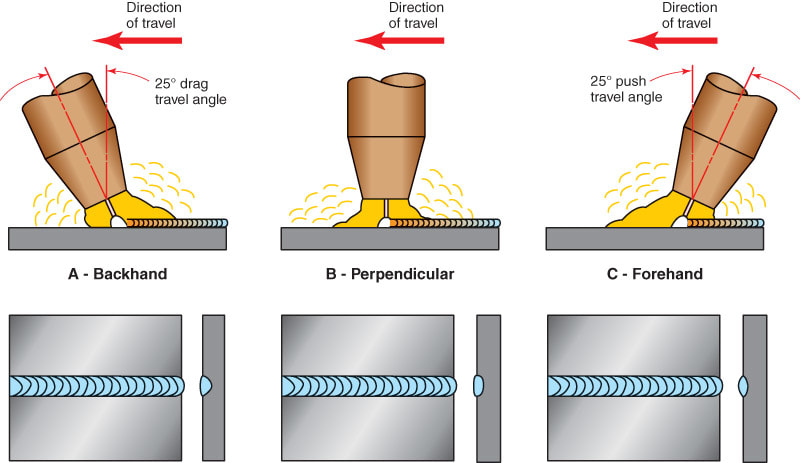
Figure 9-43. Effects of the welding gun angle on the bead. A—Backhand. B—Perpendicular. C—Forehand. Notice that the backhand angle gives the deepest penetration.
